QIRX SDR

Calibrate your RTL-SDR in 15 Seconds (Seconds, not Minutes)
Part II: Checks, Frequencies, Sampling Rates
A Tutorial by Clem, DF9GI
In this second part of the calibration tutorial we will see how we can use the different
possibilities offered by QIRX to check the calibration result obtained in part I for plausibility. We will further compare
our "DAB-related" calibration method against the one used by the "rtl_test" utility shown in part I. We'll see the that correcting
the "ppm-error" is more than correcting the frequency error, and will give us additional benefit, not only for DAB.
Stay tuned! The fun continues!
For this part we need the Windows QIRX version, because the Linux version regrettably - due to Mono weaknesses - is not
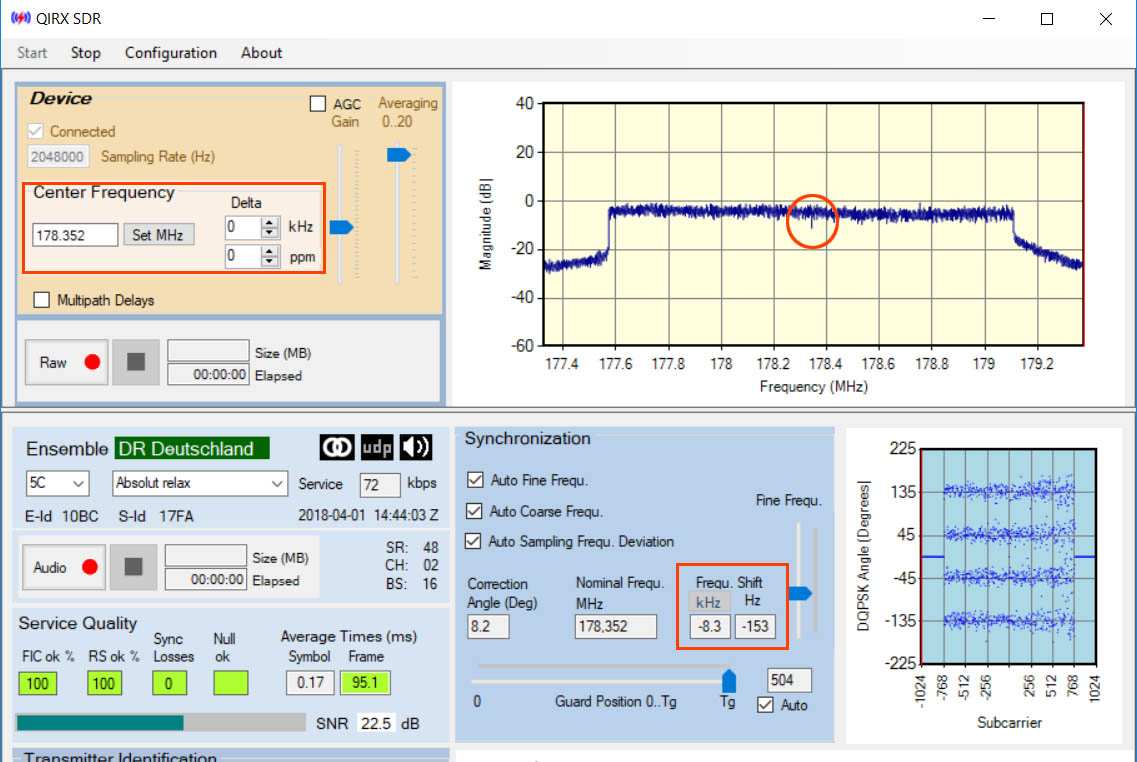
able to show spectra. In the following picture, the parts we are going to use are marked with
red rectangles and a red circle. You might notice that the correction frequencies in the "Synchronization"
box are slightly different now, most probably due to a different ambient temperature. We are going to use again ensemble
(or "multiplex") 5C, having served us already in part I.
Let's start with the part of the spectrum in the red circle. In the center of it, you will notice a "dip" in the spectrum.
This dip is generated by the DAB transmitter and exactly located at the center frequency of the ensemble, the "Nominal Frequency"
as it is called in QIRX.
It indicates the suppressed central carrier and is not used in the information transfer. To
see it as clear as in the picture, you need a clean spectrum. You may also note the high averaging used, removing most of the noise.
-
Suppressed Central Carrier Inspection
To obtain the position of the central spectrum "dip" more accurately, we just need to zoom into this part of the spectrum. In QIRX, this is performed by clicking into the spectrum and dragging the mouse to the right.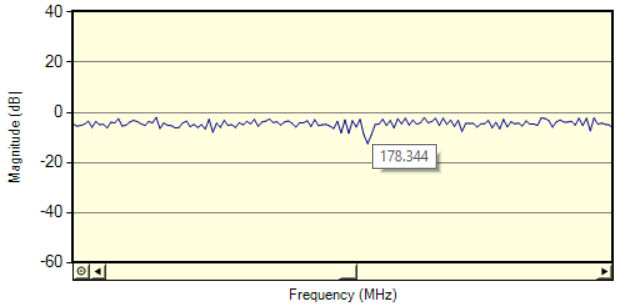
The tooltip in the picture indicates the frequency of the spectrum "dip" as 178.344MHz, although, as we know, this position in reality corresponds to 178.352MHz. This makes a lot of sense, because the measured frequency error was around -8kHz. -
Hardware Frequency correction
After this first course plausibility check of our calibration, let us do now the next, more precise check of our RTL-SDR calibration. Couldn't we re-program the frequency of the hardware with such a value that we obtain in our "Synchronization" window a zero error?
Now comes your part, please consider a frequency error of -8kHz:
Question 1: Keeping the error of our receiver in mind, which frequency should we enter as "Center Frequency" in the "Device" box to get the DAB synchronized with (more or less) zero frequency error in the "Synchronize" box?
Question 2: If we manage to do this correctly (i.e. the music plays), which frequency of the central dip will be displayed in the tooltip of our spectrum?
Please take your time for the solution, it is part of the exam! I won't show a picture with a solution here, in order not to spoil the fun. The solutions are perhaps less trivial than expected. -
Hardware ppm correction
Let us now do the most obvious and put the measured ppm-value into the box reserved for exactly this input. In QIRX, you find it in the "Device" box under "ppm" (surprise!). The input is accepted by the software after you leave the input field. A resync follows immediately after having changed the ppm value, the result shown in the next picture.
You notice I entered 45 instead of 46 ppm. Ambient temperature change! But much more important: the error measured by the software is only 4Hz, as indicated in the right rectangle! Again, not too bad a coincidence between two completely different compensation methods: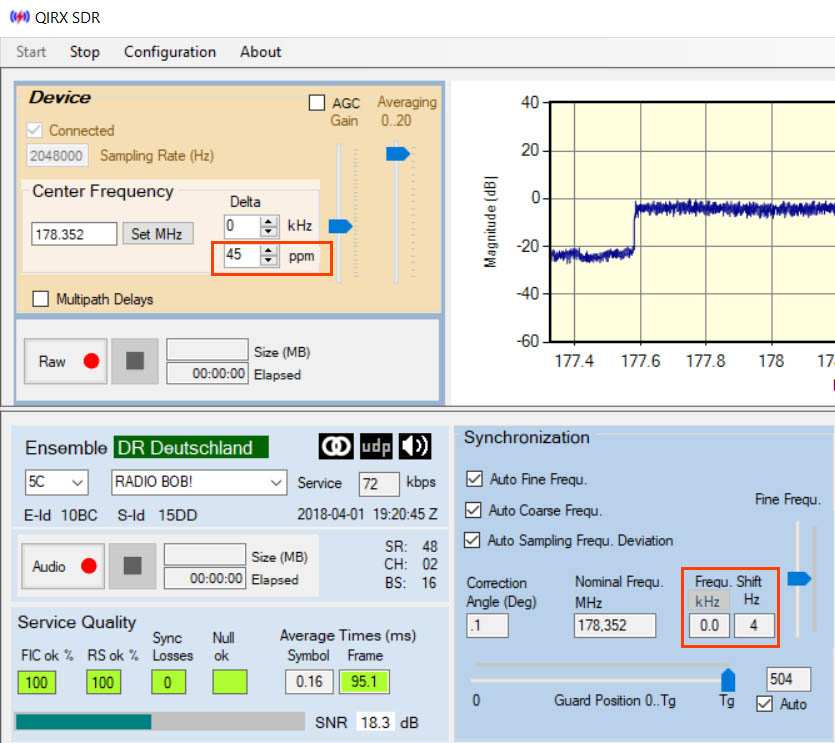
On the one hand the correction values measured by the DAB software, on the other hand letting the hardware do the correction by the same value.
However, questions arise! Are the two compensation methods really based on the same ground? -
Comparison ppm-Correction - Frequency Correction
For an answer to this question, let us go back for a moment to part I of this tutorial and have a look at the output of the rtl_test program: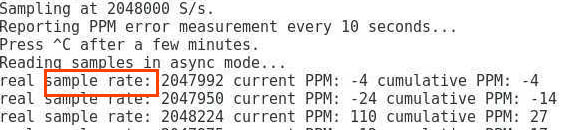
The output values are irrelevant here, what is important is the content of the red box: This little program measures sample rates, not frequencies. This is something rather different than the measurement of QIRX and other DAB software for the frequency correction. When reprogramming the hardware with another ppm-value instead of another frequency, superficially the result in the DAB-software is the same: in both cases the frequency error becomes more or less zero. What is happening "behind the scenes" is rather different.
Do you remeber our little quiz, in particular the answer for question 2? Now let us see what the frequency spectrum tooltip shows after having reprogrammed the hardware with the correct ppm-value.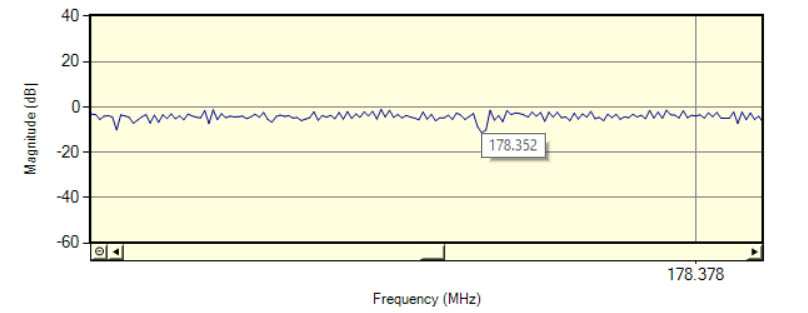
That's it, the tooltip shows the correct value. This means that now, having corrected the hardware with the ppm-value measured by either a sampling rate deviation or a frequency deviation, the output of the hardware frequency is automatically corrected as well, with the nice consequence that the spectrum scale tells us - for the first time - the truth.
The reason behind this - measuring sample rate deviations results in the same ppm-correction as measuring frequency deviations - is very probably due to the fact that both parameters are derived from the same clock of the receiver.
This is of course beneficial not only for the DAB case, but for the whole frequency range of the receiver. It is the reason why all SDR programs offer to enter this value for the re-programming of the receivers hardware - they just want to give you a chance for WYEIWYG - what you enter is what you get, and not many kHz off the entered frequency ! The prerequisite: Calibrate!
Of course, the very nice thing with the "DAB" calibration method is the speed of the measurement accompanied by its high precision.
As a result of all this, you may appreciate the fact that QIRX stores the ppm-value being present in the "Device" box in the qirx.config configuration file, and reloads the value on a new start of the program. You can check the correctness of that value after startup in DAB mode by having a quick look at the "Synchronization" box. The kHz frequency deviation value must not exceed 0.1kHz. If it does -perhaps you are using a different receiver- just take another 15 seconds to recalibrate. However, this comfort is not for everybody, it is exclusively available to DAB users! -
Improving the accuracy
We could try to even improve the accuracy of the ppm measurement by applying different ppm-values in a sequence, and notice each time the frequency deviation measured by the DAB. We could draw in a coordinate system the measured frequency deviations on the x-axis, the applied ppm-values on the y-axis. The best ppm-value would be obtained at the point where the frequency deviation crosses zero.
Of course, this would be of practical value only if the hardware would be able to accept these fractional ppm-values, which it is probably not. However, it would be interesting to compare the accuracy of this method with the one obtained by a measurement performed with a frequency counter of high accuracy. -
Doing it the right way?
This gives rise to a question specific to digital modulation schemes like DAB: Is it sufficient to correct only the center frequency, or shouldn't we correct the sampling rate error as well? This is a serious question deserving a serious answer. I'll try to give it in the third (and last) part of this tutorial.